Shoutcast DSP Setup Guide
SHOUTcast DSP Setup Guide
Start streaming music in just a few minutes, using Winamp and the SHOUTcast DSP plugin. Use SHOUTcast DSP to stream music on Icecast or SHOUTcast servers, available from Server Room.
Requirements
To start off, let's make sure you have the essentials. In order to broadcast you should have the following components and/or softwares:
Operating System: Windows Vista, Windows 7, Windows 8, Windows 10
Latest version of Winamp: Download
Nullsoft Shoutcast Source DSP Plug-in for Winamp: Download
Internet Access: Although you can broadcast with a 56k internet connection, a DSL or Cable connection to the internet is recommended for optimal performance.
If you already have the above requirements, please continue in your reading. If you do not have the above requirements, you may read on but you may experience problems other than those addressed in this tutorial.
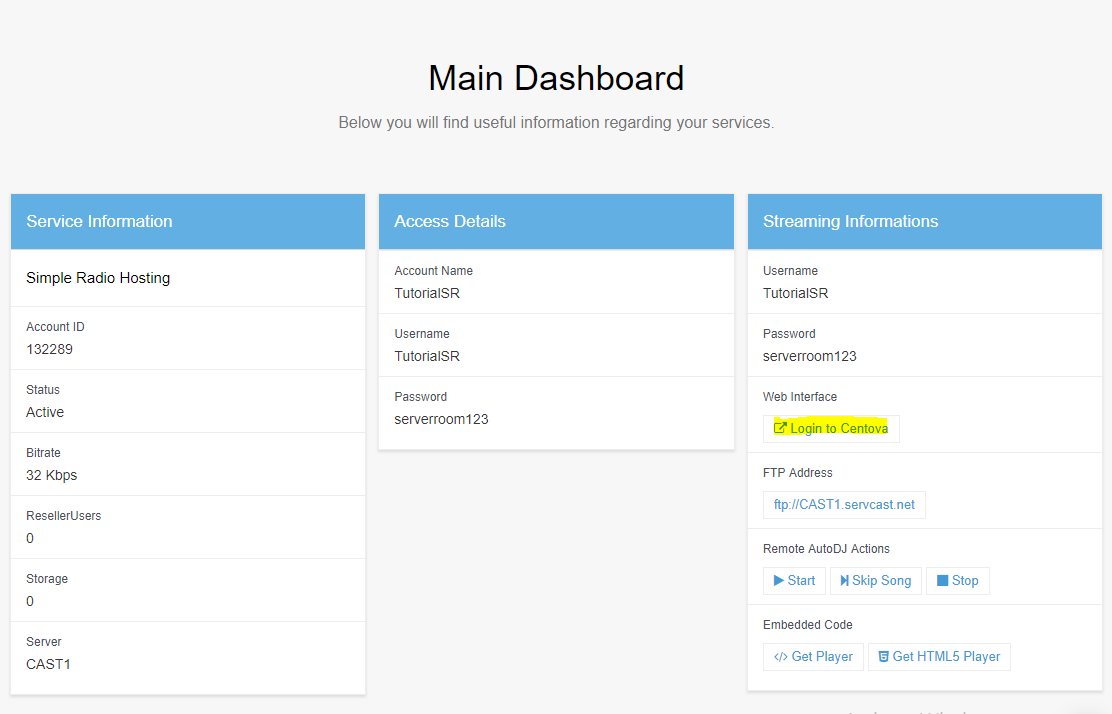
Let's begin. Log in to your Server Room account and you will be automatically redirected to the Dashboard page (Control panel). There you should have a "Login to Centova" button which will redirect you to the actual SHOUTcast station panel.
Retrieve the streaming information
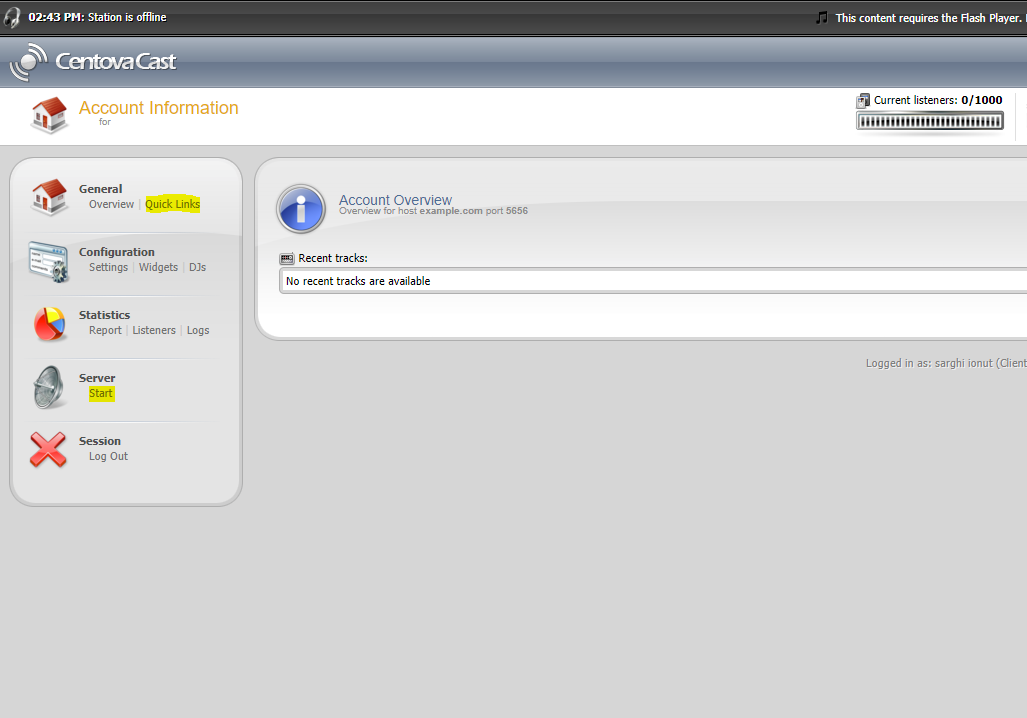
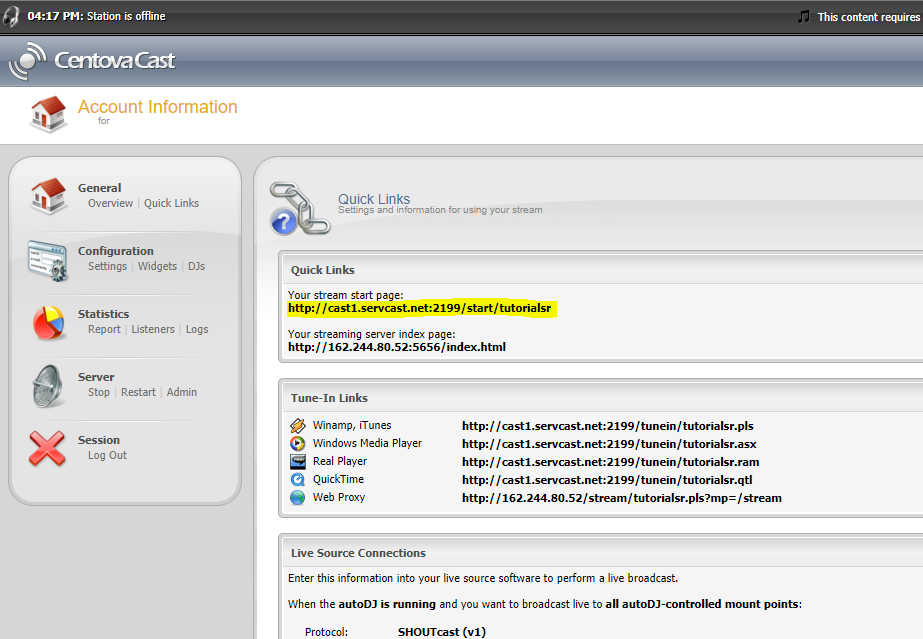
Now that you are in the Centova Panel, click on the Start button from the menu to power on your SHOUTcast station then click on Quick Links so you can get the station informations.
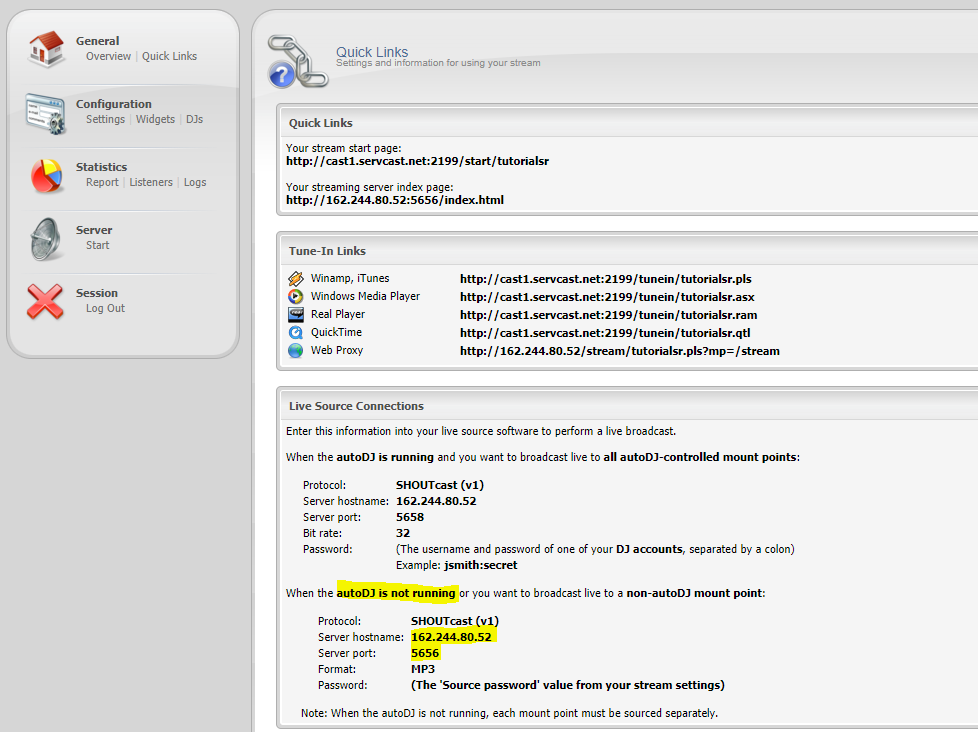
On the Quick Links page scroll down to the Live Source Connections category and get the Server Hostname and Server Port. You will need these later when you setup your Winamp encoder.
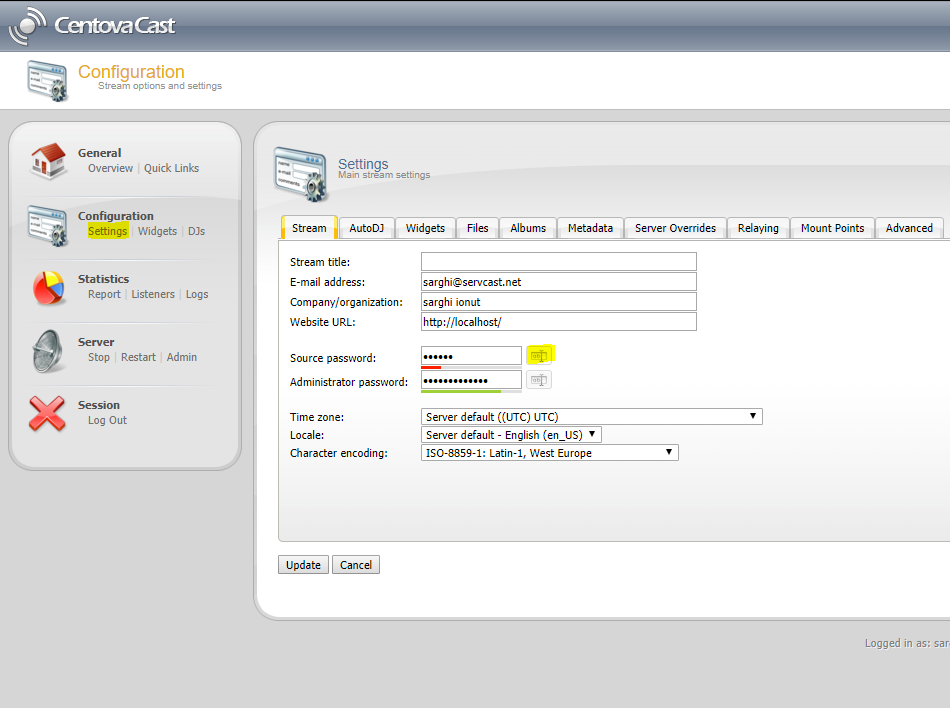
Now to retrieve the Streaming Password you need to access the Settings section of Centova Panel then click the small button near the source password field to reveal the text.
Setup Winamp with SHOUTcast DSP
You are now ready to setup the Shoutcast Source to broadcast to your Server Room streaming audio server.
For this step, you must know your Server Hostname, Server Port, and Streaming Password that you saved from Step 2.
Run the Winamp installer that you downloaded from Step 1 and install the software.
Run the SHOUTcast DSP installer that you downloaded from Step 1 and install the software.
Open the Winamp software from your computer's Desktop.
Press CTRL+P on your keyboard to open Preferences -> Click DSP/Effect and double click SHOUTcast Source DSP v2.3.5.
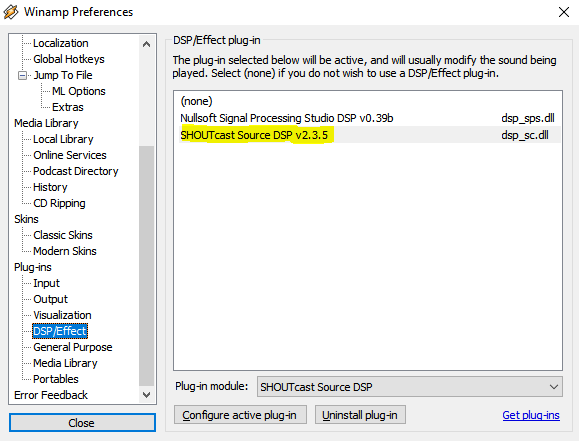
Now insert the required information on the DSP page that you just opened.
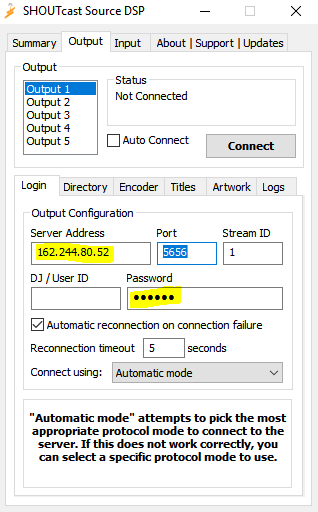
Add the Server Hostname, Port and Streaming password, make sure you leave the Username field Blank.
Under the field labeled "Address" you will need to enter the address of your Server Room server. This should not include a http:// or www prefix.
Next you need to provide the Shoutcast source with your servers port information, which would have been provided to you at the time that your server address was also provided to you. This should be a number entry only and entering a value other than a number will produce an error when connecting. An example of a correct port configuration would be 8000 or 1234. You should enter this information under the field labeled "Port".
You will also need to provide Shoutcast Source with the valid password to your Server Room server. This too was given to you at the time your server address and port were given to you. You will not be able to broadcast if you lose or forget your password so make sure to store it in a safe place at all times. Do not reveal your password to others! Enter your servers password into the field labeled "Password". Notice that the password is masked, so make sure you type carefully. An example of a correct password would be changeme or pasword1234.
The other options presented to you on screen are optional but recommended. By default, the value of "Connect at Startup" is unchecked; however, if you wish to start broadcasting as soon as you load Winamp you will want to check this option. Also, by default the value "Reconnection Timeout" is set to 30 seconds. If you wish for the Shoutcast Source plug-in to attempt to reconnect to the server upon being disconnected, you should set this to 0. If you do not wish to immediately reconnect but wish to wait x number of seconds, you should set this value to the one of your choosing.
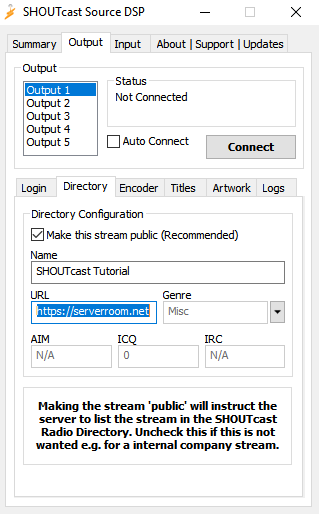
You will now need to set the Directory setting for your broadcast. The Directory setting is optional but will allow your station to be listed on the Nullsoft Shoutcast website at www.shoutcast.com.
The Directory setting also allows your listeners to see what is currently playing and what the name of your station is.
To access the Directory configuration, click the button labeled Directory to the right of the "Connection" button.
You should now see a dialogue window that looks like the screenshot above. If you would like to make your radio station (server) public, or in other words listed on the Nullsoft Shoutcast website at www.shoutcast.com you should check the checkmark labeled "Make this server public". An example of a scenario in which you would want to uncheck this option would be if you were streaming a audio conference for your business in which you only wanted your business associates to have access to the stream. Making a server private does not password protect it, it simple does not list it on the shoutcast website.
Under the field labeled "Description", you should enter the title of your radio station or broadcast. An example would be "Server Room sample radio station" or "Johns Music" - this field can contain any alphanumeric entry including general punctuation (periods, semi-colons, asterisks, etc.).
Under the field labeled "URL" you should enter the website of your radio station, your personal website, or a website that pertains to the stream itself. For example, if you were broadcasting a talk show about current or news events you could either link to your website or you could link to http://www.cnn.com. You must format this field with a http:// prefix (www prefix optional depending on your webserver). A correctly formatted url would look like http://www.serverroom.net, http://www.bobsmp3music.com/music/mymusic.html, or http://microsoft.com. If you do not have a website or a website with content applicable to your stream, you should specify either http://www.serverroom.net or http://www.shoutcast.com or leave this field blank.
Under the field labeled "Genre" you should specify what type of music or content you are streaming. For example, if you were broadcasting a live talk show you could enter in this field talk or live talk radio. If you were broadcasting a Rock show you could specify Rock and so forth.
The field labeled "AIM" is provided for people who have an AOL Instant Messenger screen name which are available free at www.aim.com. This is also the same for the field labeled "ICQ" which is available at www.icq.com. The purpose of these fields is to allow your listeners to make instant music requests or leave feedbacks on your stream. If you do not have an AIM or ICQ username, or do not wish to include it along with your stream, you should leave these fields blank.
The field labeled "IRC" is for those who wish to link their stream to an Internet Relay Chat server. If you do not have a chat room on an IRC server, or do not wish to include it with your stream you should leave this field blank.
Finally, you need to specify whether or not you wish to include what song and artist are currently playing on your stream. By default this field is checked, and we recommend leaving it as so but their are some scenarios in which you may wish to disable this feature such as if you were broadcasting a live talk radio show. You may also choose to uncheck the options labeled "Auto" to the right of the fields labeled Title and URL. Doing so will un-grey these fields and allow you to supply the stream with a custom title for what's playing and an alternate URL than you provided above.
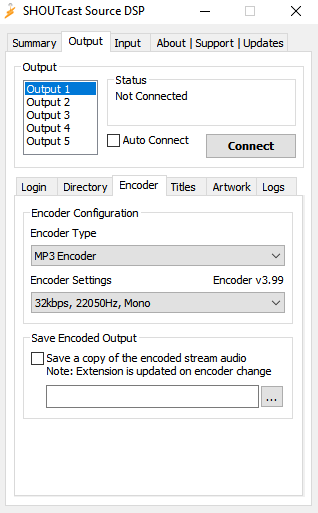
You should now click on the tab on the top of the Shoutcast Source labeled Encoder which will change the dialogue to what you see below.
The encoder configuration allows you to specify which bitrate you wish to broadcast your stream in. If you wish to make your stream available to 56k modem users, you should select 24 or 32kbps. However, if you wish to broadcast to DSL or Cable users, you should select anywhere from 64kbps to 128kbps. Broadcasting at a bitrate higher than 128kbps is not recommended as many internet users cannot receive bitrates of higher bitrates. We also discourage this as it can bog down our servers. Please note that a standard audio CD is encoded at 128kbs and by going higher than the original recording bitrate you are simply wasting expensive bandwidth for nothing.
Unless you are broadcasting to more than one server, you should only change the encoder settings for Encoder 1 as changing others will have no effect on your stream.
Choose your bitrate selection carefully, and make sure you tell your listeners what their required internet connection speed is. Notice that you also have the choice to broadcast a mono or stereo signal which should be chosen at your discretion.
Note: Free Radio Streaming plans are limited to 32kbps, so please select the right value in the Encoder settings.
Setup Audio Source
Finally, you will need to setup your input to the source. Click the tab on the top of the Shoutcast Source that is labeled "Input" and you will see the following dialogue.
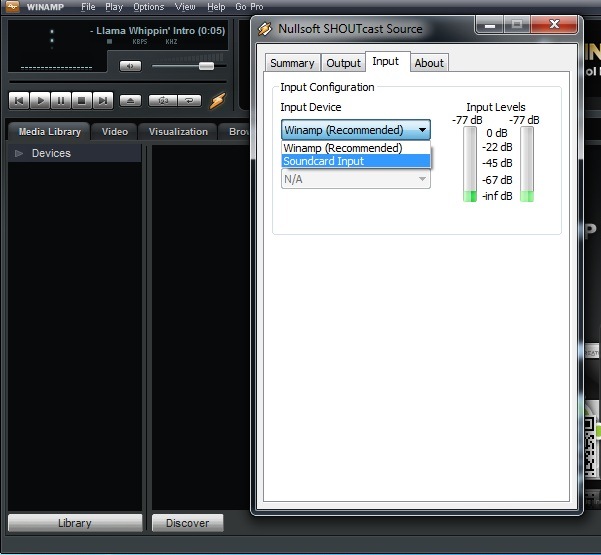
Notice that by default the Input Device selected is Winamp. This option will simply broadcast whatever is playing in Winamp, without broadcasting any other sounds that may play on your computer. This setting is recommended for most users, especially those who simply want to stream a playlist of music without any other sources.
You may also choose to broadcast using a Soundcard Input, which will allow you to broadcast not only what is playing in Winamp but also any other sounds that you play on your computer along with your computer microphone. Advanced users may even want to setup a mixing board to the line input of their soundcard to broadcast a mix of music and voice. The Soundcard Input is especially popular among those using Shoutcast for an online radio station.
To use the Soundcard Input, you should first select it from the drop down menu. Notice that the Input Settings drop down menu has now become un-greyed.
For best sound quality, you should select 44100Hz, Stereo as your Input Setting.
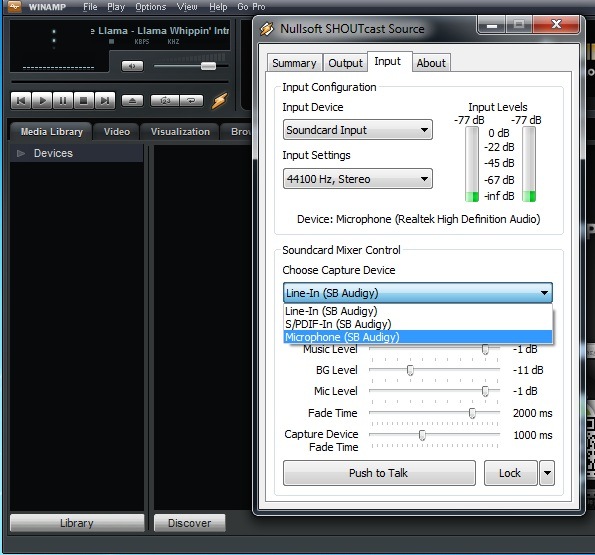
Under the Mic Input field, select which input on your sound card you will be using as your source. If you are using a standard computer microphone, you should select Microphone. If you are using a mixer board, an external CD Player, or some other form of sound that is not plugged into your Microphone input on the soundcard, you should select Line Input as your Mic Input.
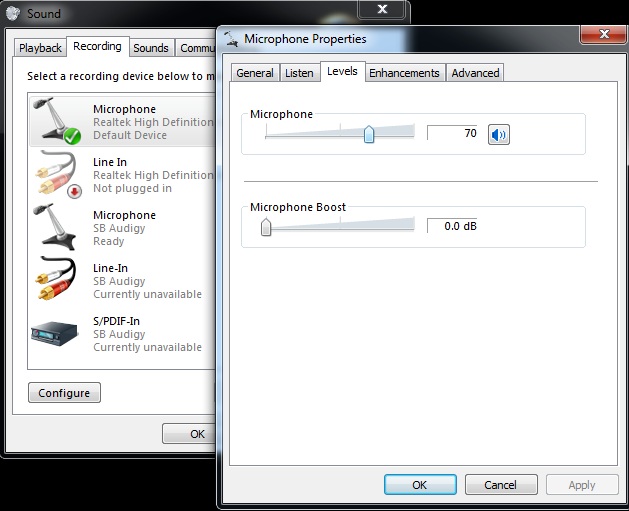
You should now click the button to the right of the field labeled "Mic Input" that reads "Open Mixer". This will bring up the Windows mixer which will allow you to configure your sound card. You must make sure you have checked the option under your soundcards Recording Control labeled either "Stereo Mix, Wave Mix, What you Hear, etc.). You will need to consult your soundcards documentation if you can not find a similar option.
Because all soundcards are not all the same, your soundcards configuration and/or wording may be different than the one shown above. You should consult your soundcards documentation if you have problems setting this up.
After you have made this configuration, you may close Windows Mixer.
Listen your stream
You can now go back to your Centova Panel, access the Quick Links tab and listen your stream from Your stream start page.
Congratulations!
You are now ready to connect to your streaming audio server and test your broadcast settings. You may do so by clicking on the "Output" tab on the top of the Shoutcast Source window and clicking on the Connect button. If you have chosen to use the microphone as your second input (to talk-over your music) you may wish to return to the "Input" dialogue which will give you some more options such as a talk-over function that will aid you in performing live voice-overs. You may also wish to adjust the sound levels on the "Input" dialogue to further fit your needs. Happy streaming!
Did you know we sell streaming services?
Our audio and video streaming services come with unlimited connections, unlimited bandwidth, and are backed by our 24/7 expert support staff!